I promised a sneak peek of one of the new sets Crafty Secrets is coming out with at CHA next weekend! I just have to say, Sandy Redburn (Owner of Crafty Secrets) has THE most fun sense of humor. I love all the fun sayings she comes up with! I'm sad to say that her favorite expression did not fit on the sheet of stamps....she was also going to add "Squeeze me, stomp me, make me wine" but didn't have room! DANG!
I also just have to say, if you liked the Coffee & Tea Chickies, there will soon be MEN to match them! I feel faint! I have the vapors, as my Grammie would say. The stamps will be available after CHA...I'll post dates on my blog once they are up and available at the Crafty website. ;)
So I thought I'd give you a peek at one of the things I'll be demoing at the Crafty Booth. Notice the fun little circular wreath of grapevines? It's for the bottom of your wine glass! (Wine charms!) Sandy is a genious! The stamp fits PERFECTLY in the Marvy 2 1/2" circle punch. Here's how to make them:
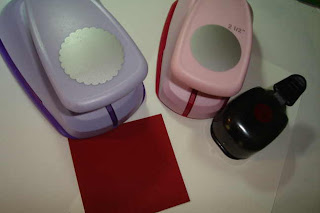
 You'll need the following:
Marvy Giga Scallop Punch
Marvy 2 1/2 Inch Mega Circle punch
5/8" circle punch
Scissors & Exacto Knife
Crafty Secrets Wine Stamp Set/acrylic block
A bleed-free ink, such as Ranger Jet Black
Something to color with.
(If you don't have scallop punches yet, see Ellen Hutson...she's got a great new product from Spellbinder.)

Take your 2 1/2 inch circle punch and punch out a piece of white cardstock. Hint: Turn the punch over so you can see where you're punching...

Punch a scallop out of colored paper with the Giga Scallop Punch.

Take a 5/8" small circle punch and punch it directly in the center of the white circle.

Ink up the stamp and stamp the grapevine wreath in the center of the white cardstock, taking care to leave room underneath the bottom leaves. Color it in with colored pencils, or a watercolor pen & inks, whatever you're used to using. Attach the white cardstock to the colored scalloped mat.

Take a scissors and cut a slit from the top of the cardstock down to the bottom of the inside circle.

Take your exacto knife and cut a slit crosswise the other way, so the center looks like a criss cross.

Presto! You're done! Attach the wine charm to the bottom of your guest's wine glasses!
And then have a big glass of wine!
Tomorrow: Wine Journal

13 comments:
Zappy........amazing!
Terrific idea!
How cool.
You are gonna blow me outta the water with this set, I just KNOW it!!!
genius!
Oh my word!!! You are "diwine"!! You've "got me" with Merlot! Should I stand in line somewhere?
Fabboooooo toot, Lisaz!
~Tex
Outstanding tutorial LZ! These are wonderful. This is such a cute gift idea to add to that old stand by of a bottle of wine.
Awesome idea!!! I may have to buy this set too!!! Does the madness ever end? : )
Love those wine thingamabobs. I love wine (and I make my own). Those stamps rock! Thanks for showing us another side to your creativity. You know I'm a big fan of yours!
"You had me at Merlot" ....... seriously? I thought I'd have to buy this set just for that sentiment but then the wine charm thingy? Too cool.
You're a creative genious! I love it.
BRILLIANT! I am SO doing this at my next pary!
Hi Lisa, I want to get this new set but can't find how to purchase it. It doesn't seem to be available on the Crafty website. Can you help out? Just let me know if there is somewhere else I can visit to purchase this.
Thanks,
Angie
Awaren6@houston.rr.com
Post a Comment